
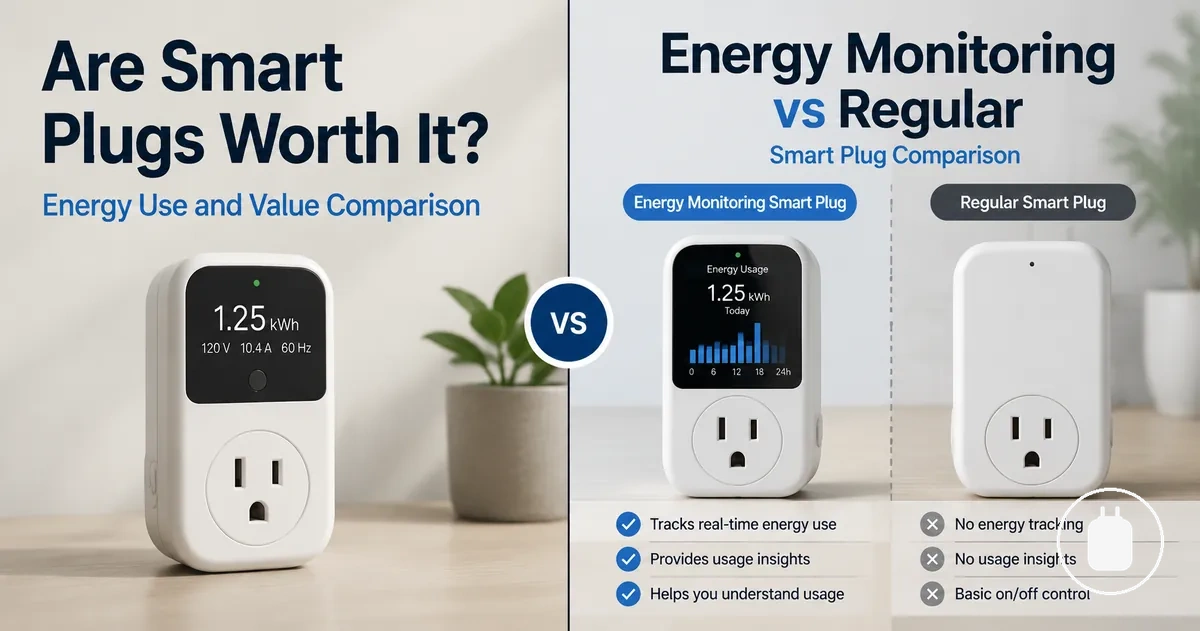
Energy Monitoring Smart Plug Setup
Energy monitoring smart plug setup starts with preparing the plug, app, outlet, and connection path before checking the first energy readings. The normal setup path moves from app preparation to pairing mode, Wi-Fi connection, appliance assignment, and monitoring confirmation.
The setup process can vary depending on the smart plug model, app design, and supported connection method. Different devices may use different app screens, pairing signals, or connection steps. These variations still follow the same general process of preparing the plug, connecting it, and confirming available energy data.
An energy monitoring smart plug setup begins with checking the required items, including the outlet, phone, app account, permissions, and home network conditions. The plug is then placed into pairing mode so the app can discover and connect it. After the connection process, the appliance can be assigned and the first energy readings can be checked through the app. The following setup stages explain these connected steps in more detail.
Detailed compatibility checks, app data tracking, reading interpretation, and persistent connection problems require separate deeper contexts. This setup process focuses on creating the initial connection between the energy monitoring smart plug, the app, Wi-Fi network, and connected appliance.
Setup Requirements for an Energy Monitoring Smart Plug
Setup requirements for an energy monitoring smart plug depend on preparing the plug, app, phone, outlet, and home network before pairing begins. Confirming these setup conditions helps identify missing requirements that may affect pairing or the first energy readings.
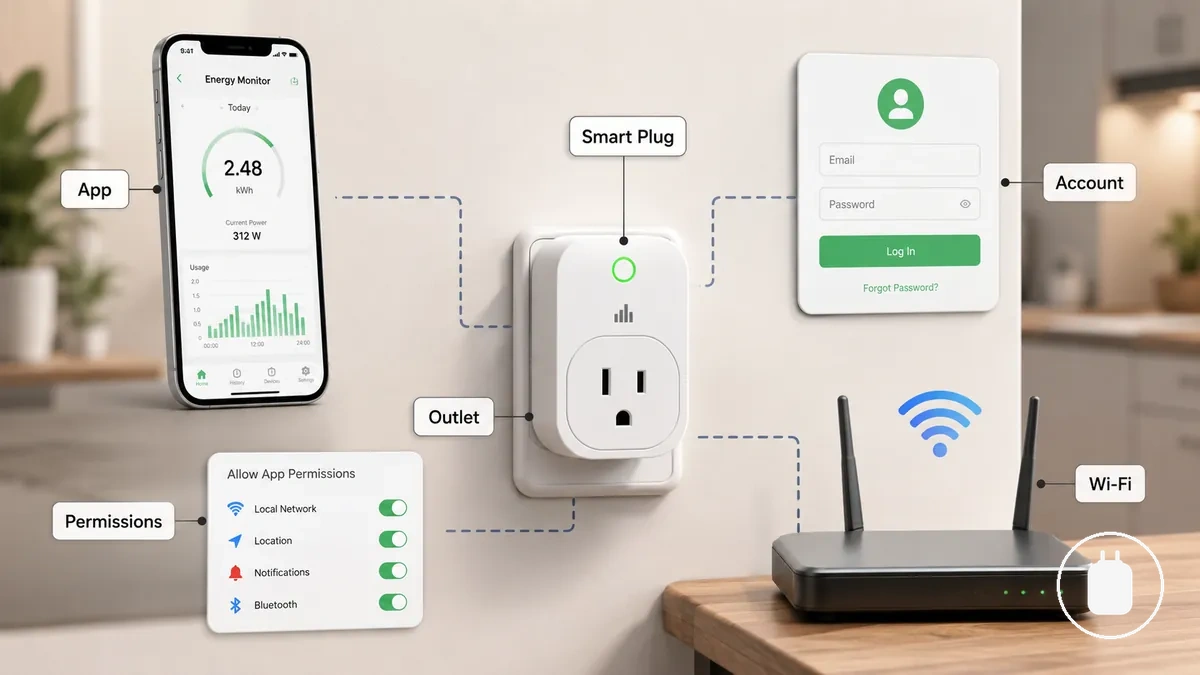
The energy monitoring smart plug may require an app account, phone permissions, and a powered outlet before the connection process starts. The phone needs access to the app setup flow, while the outlet needs to provide power so the plug status can be checked. Home network conditions may also influence the connection process, including available Wi-Fi details and supported connection methods. Some no-hub models may use an app-supported connection path, while other configurations may depend on different setup conditions.
Energy monitoring smart plug readiness can be checked by separating local setup requirements from network setup requirements. Confirming the app, account, permissions, outlet, and home network creates the correct starting point before pairing. For broader connection conditions that extend beyond setup readiness, review compatibility requirements.
Setup Requirements for an Energy Monitoring Smart Plug verify whether the essential conditions are present before pairing and first energy readings. The checklist below confirms the main requirements and the likely effect of each missing condition.
- Energy monitoring smart plug: Confirm the plug is ready for setup and can enter the required connection state. An unavailable plug status may prevent the app from starting discovery.
- App and account: Confirm the app is available and the account setup is ready. Missing account access may interrupt the setup process.
- Phone and permissions: Confirm the phone can access the permissions required by the app. Missing permissions may affect device discovery.
- Outlet and power: Confirm the outlet provides power and the smart plug is connected correctly. A powered outlet is required before checking plug status.
- Home network: Confirm the home network details are available for the connection process. Network conditions may affect communication between the app and plug.
- 2.4 GHz Wi-Fi: Confirm whether the setup process requires this Wi-Fi condition. The supported Wi-Fi connection can vary by plug configuration.
- No-hub connection: Confirm whether the plug uses a no-hub app-supported connection path. Hub requirements may vary depending on the device setup method.
App, account, outlet, and phone readiness
App, account, outlet, and phone readiness checks confirm the local setup items needed before the smart plug is paired. App access, account status, permissions, outlet power, and phone proximity can affect discovery, so these items should be verified first.
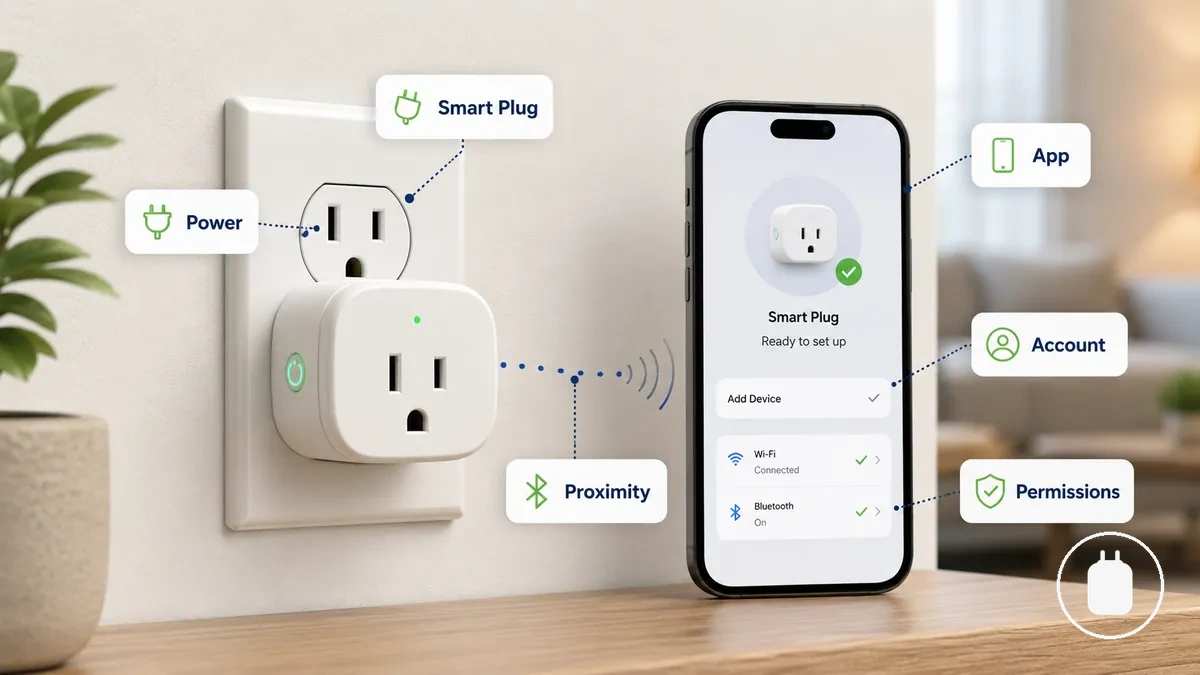
App permissions and account login steps can vary by app design, while phone access and proximity may influence the discovery process. Confirming these local conditions keeps setup focused on the items required before network connection checks.
App, account, outlet, and phone readiness can be verified with these local setup checks:
- App: Confirm the app is available for setup. Missing app access may prevent the add device or discovery process from starting.
- Account: Confirm the account login is ready when sign-in is required. Missing login access may interrupt the setup flow.
- Permissions: Confirm the app has the permissions needed for discovery. Missing permissions may affect device detection.
- Outlet: Confirm the outlet provides power and the smart plug is connected correctly. A powered outlet allows the plug status to be checked.
- Phone: Confirm the phone is available during setup and within the required proximity for discovery when applicable. Phone access can affect the connection process.
2.4 GHz Wi-Fi and no-hub connection conditions
2.4 GHz Wi-Fi and no-hub connection conditions can affect how an energy monitoring smart plug connects during setup. Router settings, SSID visibility, phone network conditions, and supported connection modes can influence the available setup path.
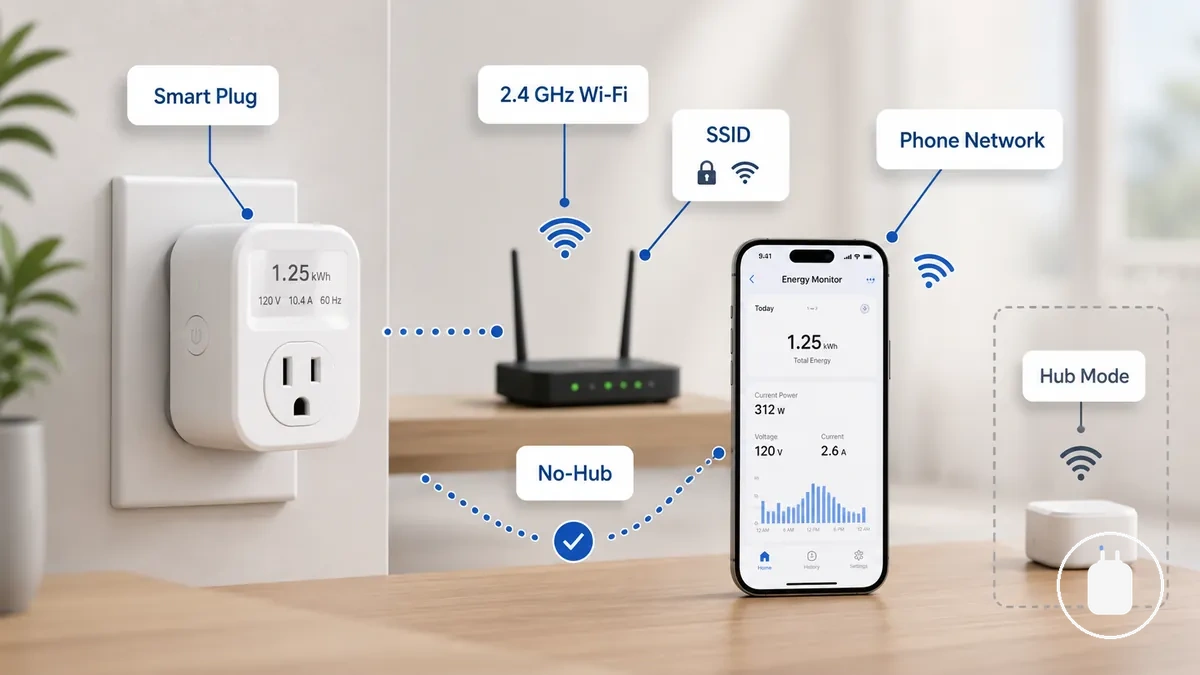
Wi-Fi band, network name, and hub requirements should be treated as setup conditions that vary by energy monitoring smart plug configuration. A no-hub model may use an app-supported connection path, while Matter, Zigbee, or hub-based variants may require different compatibility conditions rather than the same setup flow.
| Setup condition | What it changes during setup |
|---|---|
| Wi-Fi band | The supported wireless connection method may vary depending on the smart plug configuration. |
| SSID visibility | The visible network name can affect whether the app can identify the available connection. |
| No-hub app mode | A no-hub setup may use an app-supported connection path without a separate hub, depending on the device setup method. |
| Hub or protocol variants | Matter, Zigbee, or hub-based options may change the compatibility conditions involved in setup. |
Putting the Smart Plug Into Pairing Mode
Putting the smart plug into pairing mode places the device into a discovery state before it is added in the app. The smart plug uses visible signals, such as an indicator light pattern, to show when pairing mode is active.
The reset button action, button press method, or blinking pattern can vary by smart plug model. Some plugs may enter pairing mode automatically after a factory reset, while others may require a manual button press or hold. If a reset action is used, saved settings or previous Wi-Fi details may be affected depending on the device configuration.
Putting the Smart Plug Into Pairing Mode can be confirmed by checking the physical setup state and indicator behavior. The steps below show the basic actions that move the smart plug from a powered outlet into an app discovery state.
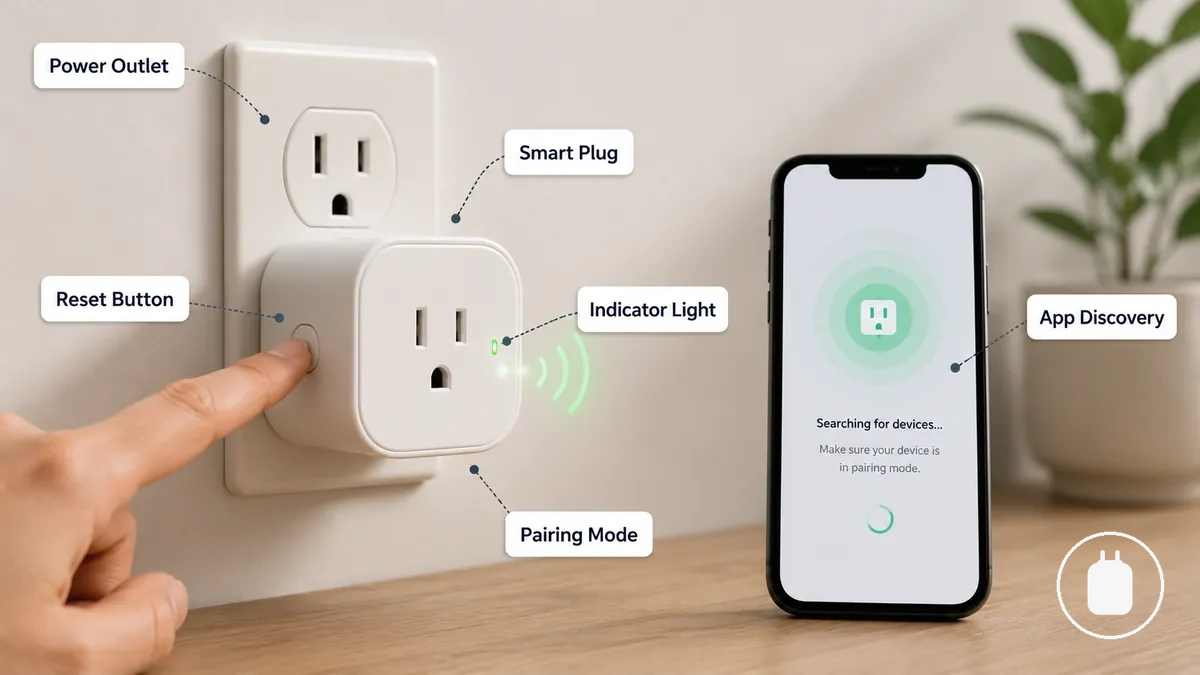
- Power the smart plug: Connect the smart plug to an outlet and confirm that the device receives power. The plug status should allow the indicator light to show the current setup state.
- Locate the reset button: Identify the button used for setup mode or reset actions. The button location and control method can vary by model.
- Use the button press: Press or hold the reset button according to the device instructions. The indicator light may change to show a pairing state.
- Check the blinking pattern: Observe the indicator light after the button action. A blinking signal may indicate that the smart plug has entered a discovery state.
- Confirm the pairing window: Continue to the app discovery process while the smart plug remains in pairing mode. The available pairing window can vary by device configuration.
Indicator lights and reset button behavior
Indicator lights and reset button behavior show the smart plug state during pairing mode setup. Light patterns can indicate different setup states, so blinking, solid light, or no light should be interpreted conditionally.
| Signal | Possible setup meaning | What to check |
|---|---|---|
| Blinking | The indicator light may show that the smart plug has entered pairing mode or a discovery state. | Check whether the app discovery process can identify the plug. |
| Solid light | The indicator light may represent another plug state depending on the device configuration. | Check the plug state and confirm the expected setup condition. |
| No light | The plug may not be showing an active indicator state. | Check outlet power and the smart plug connection. |
| Reset hold | The reset button action may change the plug state and prepare it for pairing mode. | Check the indicator light response after the reset hold. |
Adding the Smart Plug in the App
Adding the smart plug in the app starts with signing in, selecting the correct plug category, and allowing device discovery. The app must discover the smart plug before the Wi-Fi connection and energy monitoring confirmation stages can continue.
The app setup flow can vary depending on the mobile app design and supported device options. Different apps may use different menus, category names, or confirmation screens during setup. These variations change the path through the app but keep the main process focused on adding the smart plug before reviewing app data tracking.
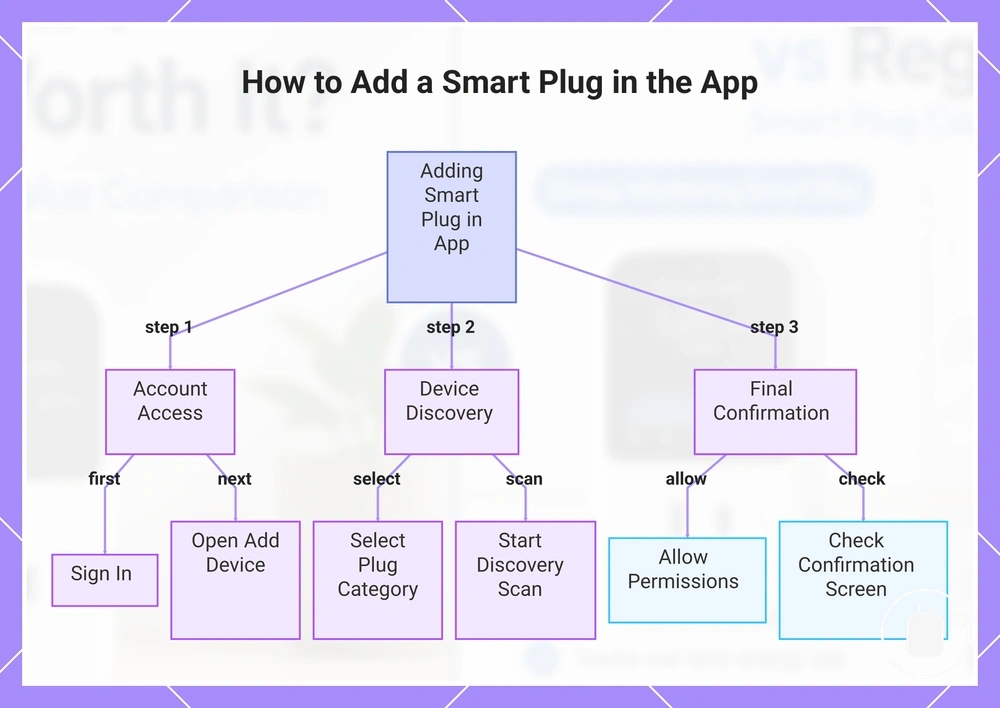
Adding the Smart Plug in the App depends on the app menu and discovery flow. Follow these steps to move from account access to device confirmation:
- Sign in: Open the app and complete the sign-in process when required. The app should provide access to the device setup area.
- Open add device: Select the add device option from the app menu. The app should display available setup choices.
- Select the plug category: Choose the relevant plug category for the smart plug. The selected category can guide the app toward the correct discovery process.
- Start device discovery: Begin the discovery scan from the app. The app should search for the smart plug when the device is ready for connection.
- Allow permissions: Confirm the permissions requested by the app during setup. Permission requirements can vary by app design and may affect discovery.
- Check the confirmation screen: Review the confirmation screen after the smart plug is detected. The screen should indicate the device has been added to the app setup flow.
This chart shows the main steps to add a smart plug through the app, from account access to final confirmation.
Selecting the plug type and starting discovery
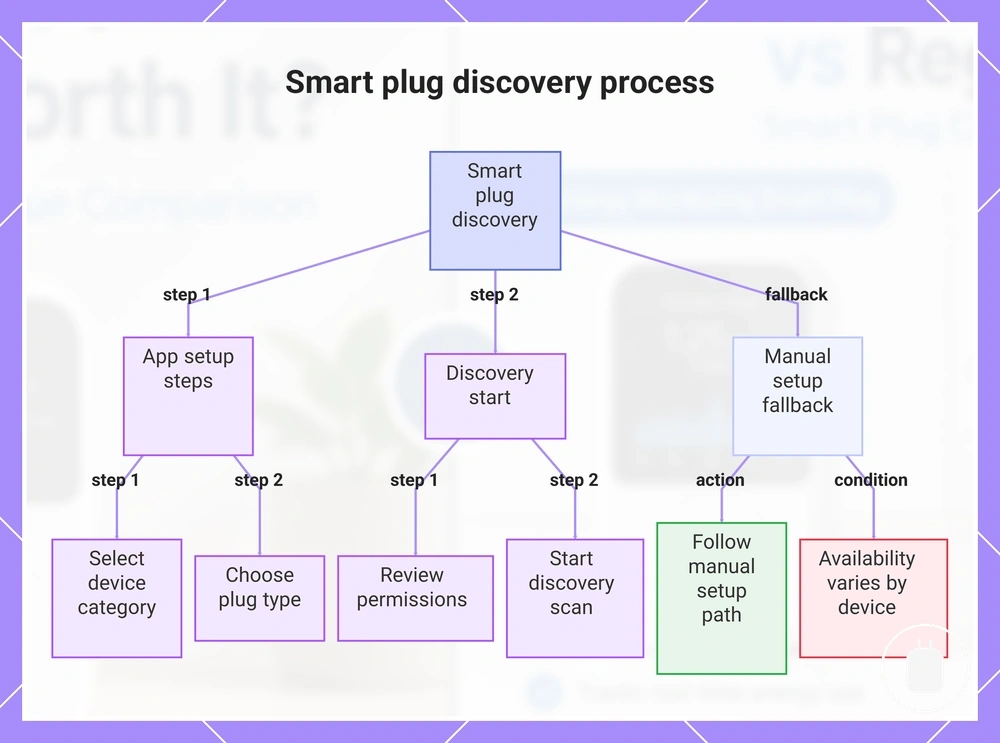
Selecting the correct plug type helps the app identify the smart plug before starting discovery. The device category chosen during app setup can affect the discovery flow used for the connected device.
- Select the device category: Open the app setup menu and choose the category that matches the connected device. The app should display the relevant setup path after category selection.
- Choose the plug type: Select the available plug type, such as a smart plug or energy plug category when provided. Category names can vary depending on the app design.
- Review permissions: Allow the permissions requested during the discovery process. Permission requirements can vary by app and may affect device discovery.
- Start discovery: Begin the discovery scan after selecting the plug category. The app should search for the smart plug when the device is ready.
- Use manual setup: Follow the manual setup fallback when the app provides an alternative setup path. Availability of this option can vary by device type and app flow.
This chart shows the main steps to select the correct plug type and start the discovery process for a smart plug, including the fallback manual setup option.
Connecting the plug through the home Wi-Fi network
Connecting the plug through the home Wi-Fi network transfers the network details from the app to the smart plug during setup. The app uses the selected SSID and password information to continue the connection process.
The setup path can vary depending on the router, app version, signal strength, and plug protocol. Separate network names for different Wi-Fi bands, including 2.4 GHz options, may change how the app identifies the available connection conditions.
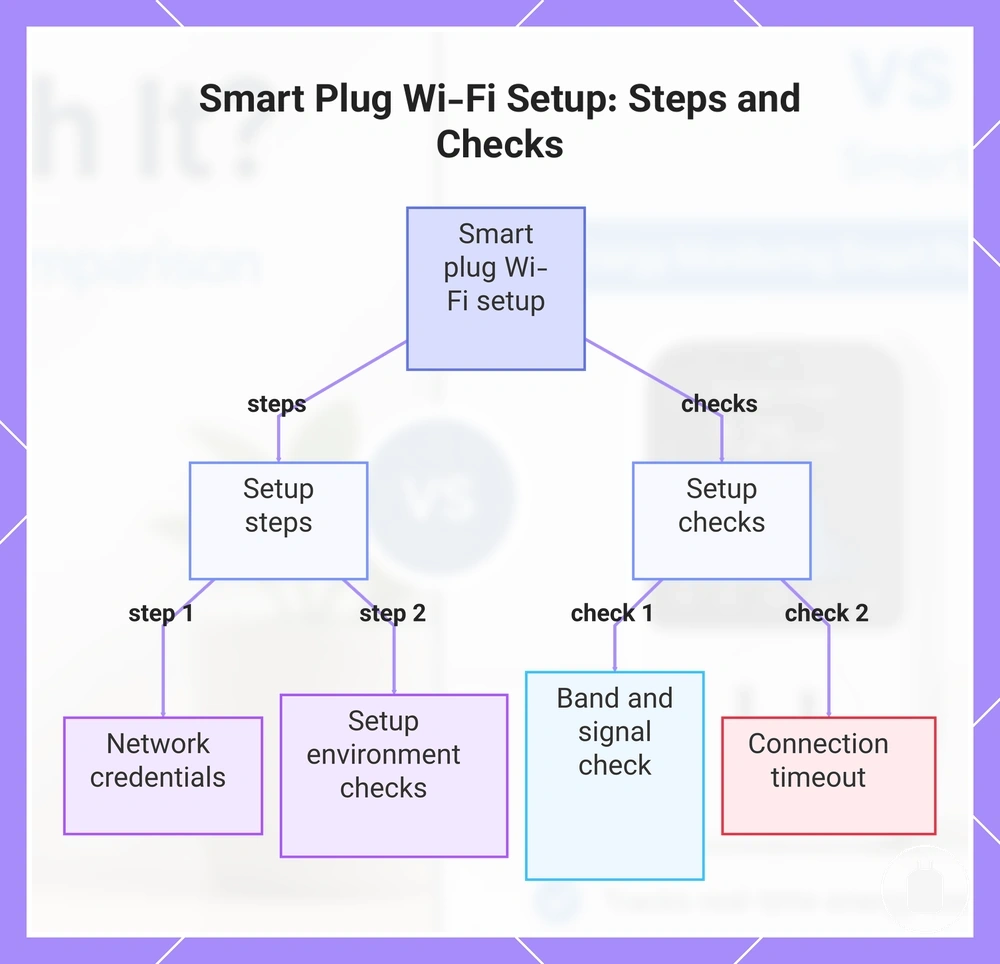
Connecting the plug through the home Wi-Fi network follows these steps to move from network selection to confirmation:
- Select the SSID: Choose the correct home Wi-Fi network from the available network names. The app should prepare the selected network details for the connection step.
- Enter the password: Add the Wi-Fi password when requested by the app. The entered credentials allow the app to continue transferring connection details.
- Maintain phone proximity: Keep the phone close during setup when required by the app flow. Phone proximity can affect the connection process.
- Check router distance: Confirm the smart plug is within suitable router signal range. Router distance can influence the connection attempt.
- Review the confirmation message: Check the app response after the connection attempt. The confirmation message can indicate whether the setup stage has progressed.
Connecting the plug through the home Wi-Fi network can be reviewed with these setup checks:
- 2.4 GHz: Confirm the supported Wi-Fi band for the smart plug setup. Band requirements can vary by plug configuration.
- Connection timeout: Review any timeout message during setup. Timeout behavior can vary depending on app version, signal conditions, and plug protocol.
- Router signal: Check the signal condition between the router and smart plug. Signal strength may influence the connection path.
This chart shows the main steps and checks for connecting a smart plug through the home Wi-Fi network.
Completing the Energy Monitoring Setup
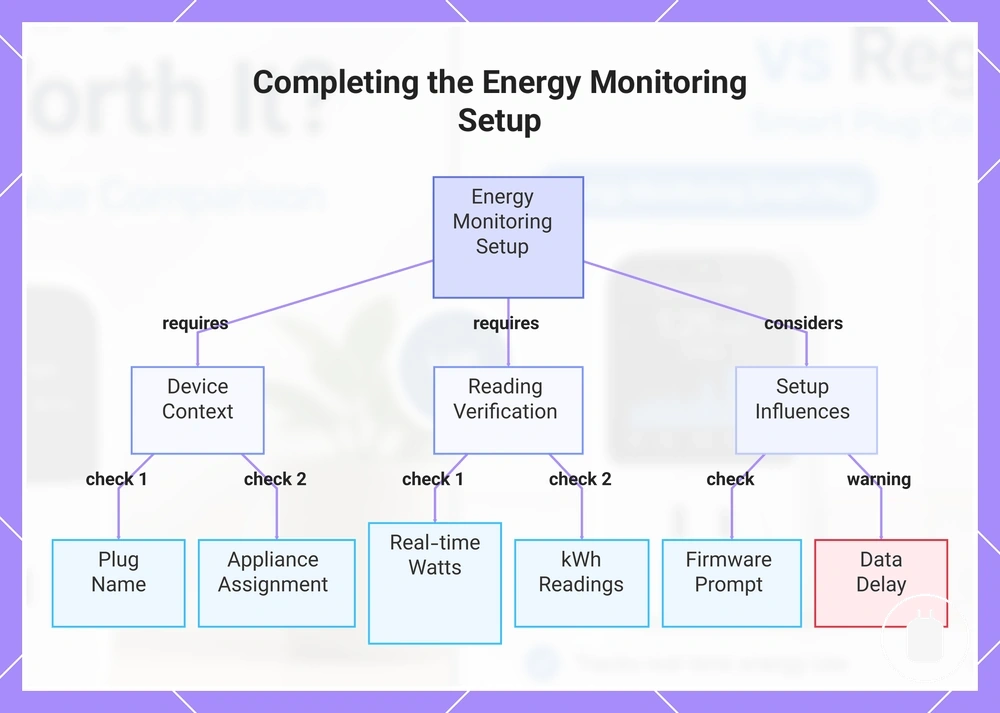
Completing the energy monitoring setup means confirming that the connected smart plug has an appliance context and that the app shows usable energy readings. Setup is complete when the app displays available power or usage data from the connected plug.
The final setup stage includes creating a plug name and assigning the connected appliance or room context when the app provides these options. These details help organize usage data, while real-time watts and kWh readings may appear after the plug begins reporting information.
Completing the Energy Monitoring Setup verifies that usable readings are active before moving into deeper reading energy data interpretation. The checklist below confirms the main setup conditions and available app information.
- Plug name: Confirm that the smart plug has a clear device name in the app dashboard. A defined name can help identify the connected appliance.
- Appliance assignment: Confirm the room or appliance assignment when the app provides these options. This helps organize usage data for the connected plug.
- Real-time watts: Check whether the app dashboard displays available power readings. The displayed information can vary depending on the device and app configuration.
- kWh: Confirm whether the app shows energy readings in kWh after setup. Available data can depend on the connected plug and app behavior.
- Firmware prompt: Review any firmware prompt or permission request shown by the app. These prompts may affect the setup state or available features.
- Data delay: Consider that usage data may not appear immediately after connection. Refresh timing can vary by device and app conditions.
This chart shows the checks and conditions required to confirm that the energy monitoring setup is complete, covering device identification, reading verification, and additional setup factors.
Naming the plug and assigning the connected appliance
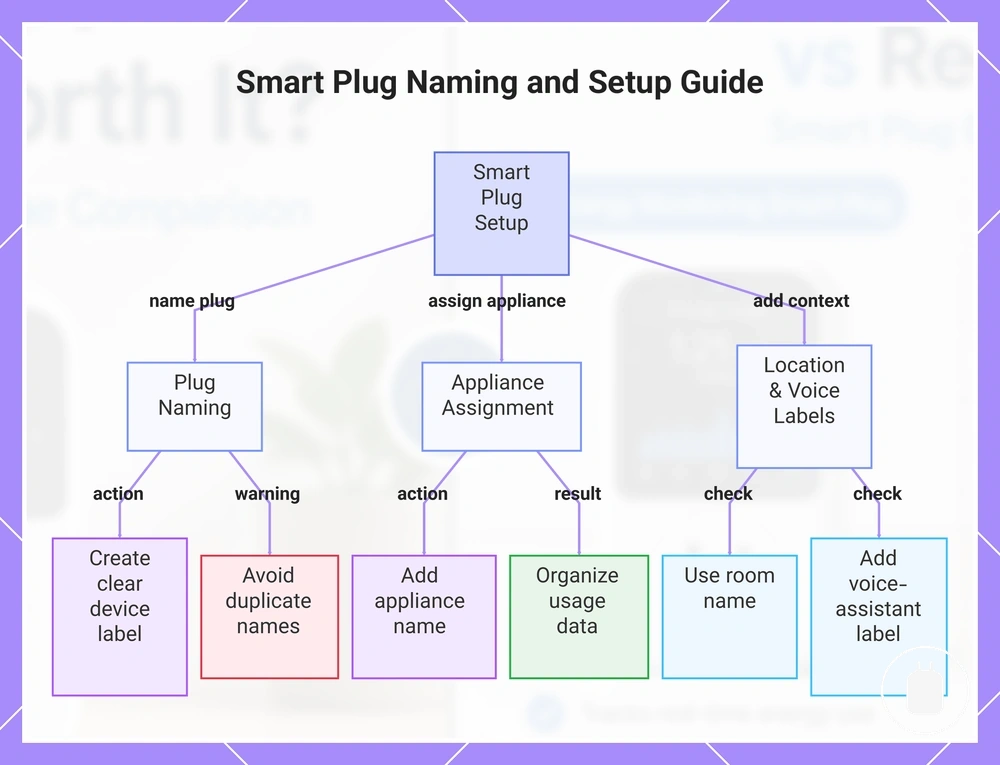
A clear plug name helps connect the smart plug to the connected appliance and makes later energy readings easier to understand. Clear labels reduce confusion when reviewing usage data in the app dashboard.
A naming convention can link the plug-level device to the tracked appliance context. For example, a plug name such as a room name combined with an appliance name may help distinguish similar devices without creating duplicate names.
- Plug name: Create a clear device label that identifies the connected appliance. A consistent name can make energy readings easier to recognize.
- Appliance assignment: Add an appliance name when the app provides this option. The assignment helps organize usage data for the connected device.
- Room name: Use a room assignment or room name to group the plug with its location. This can make the app dashboard easier to navigate.
- Voice-assistant label: Add a voice-assistant label when supported by the app or connected service. Available label options can vary by setup.
- Duplicate names: Avoid using duplicate names for similar plugs. Distinct labels can improve device identification.
This chart shows the recommended steps to configure a smart plug with clear naming and organizational labels for easier energy tracking.
Confirming real-time power and usage readings
Confirming real-time power and usage readings helps verify that energy monitoring is active after the smart plug connects. The app may show readings immediately or after an app-specific delay, depending on the connected load, app behavior, and model support.
Real-time power, usage readings, and metric visibility can vary between devices and apps. The available information should be checked as a setup confirmation because different models may show different energy metrics.
Confirming real-time power and usage readings verifies whether visible metrics are available. Use this checklist to check the connected plug, app dashboard, and displayed energy information:
- Live wattage: Check whether real-time power or live wattage appears in the app dashboard. The visible value can depend on the connected load and device support.
- kWh: Check whether kWh usage readings are available after connection. Energy readings may appear according to the app and model configuration.
- Connected load: Confirm that the connected load is producing visible power readings. Low activity or standby conditions may affect what appears.
- Appliance state: Compare the appliance state with the visible usage readings. The app may show different information depending on whether the connected appliance is active.
- Refresh delay: Check whether the app requires time before updated readings appear. Refresh behavior can vary by app and model.
- App dashboard: Confirm that the energy information is visible in the app dashboard. Available metrics can depend on the plug configuration.
Basic Setup Problems Before Full Troubleshooting
Basic setup problems often come from the pairing state, app discovery, Wi-Fi band, router distance, permissions, or delayed readings. These setup issues should be separated by symptom and likely cause before moving to deeper checks.
Common setup problems can usually be grouped by where the setup process stops. Pairing state and app discovery issues relate to device visibility, while Wi-Fi band, router distance, and permissions relate to connection conditions. Delayed readings may involve the app dashboard, connected load, or the time needed for usage data to appear.
| Symptom | Likely setup cause | Immediate check | Next action |
|---|---|---|---|
| Plug is not discovered | Pairing state, app discovery, or permissions may not be ready. | Check the pairing state and confirm the required permissions. | Retry discovery after confirming the setup conditions. |
| Connection does not complete | Wi-Fi band, router distance, or connection conditions may affect setup. | Check the selected network conditions and router distance. | Retry the connection step when the setup conditions are suitable. |
| Reconnect issue | The app connection or device setup state may need to be refreshed. | Check the app status and connected device state. | Repeat the reconnect process through the app setup flow. |
| Delayed readings | Usage data may not appear immediately after connection. | Check the app dashboard and connected load state. | Allow time for readings to appear before further checks. |
Basic setup problems should remain separate from persistent issues that continue after the immediate checks. When a problem remains after these setup checks, continue with setup troubleshooting for deeper issue-specific guidance.
Pairing failures and app discovery issues
Pairing failures and app discovery issues can happen when the smart plug is not in a discoverable state or the app cannot find the device. App discovery requires a suitable pairing state, so plug-state issues and app-side discovery issues should be separated.
- No blinking light: A missing blinking light may indicate that the smart plug is not showing the expected pairing state. Check the plug state and confirm whether it is ready for discovery.
- Expired pairing window: An expired pairing window may prevent the app from finding the smart plug. Check whether the device is still available for the discovery scan before retrying.
- Wrong device category: An incorrect device category selection may affect app discovery. Check that the selected category matches the smart plug setup path.
- Missing permissions: Missing permissions may limit the app discovery process. Check the app permissions required for finding the device.
- Phone distance: Phone distance may affect discovery conditions during setup. Keep the phone close enough for the local discovery step when required.
Wi-Fi band, router, and reconnect issues
Wi-Fi band, router, and reconnect issues can affect setup when network conditions prevent the smart plug from completing the connection process. These issues often depend on Wi-Fi band support, SSID details, password entry, router signal, and local connection conditions.
Wi-Fi setup should be separated from broader protocol compatibility questions. The checks below focus on basic network conditions rather than advanced router configuration or full compatibility evaluation.
| Network symptom | Likely condition | Check | Setup-safe next action |
|---|---|---|---|
| Wi-Fi band connection issue | The selected network band may not match the plug setup condition. | Check whether a supported 2.4 GHz network option is available when required by the device. | Retry setup using the available supported network option. |
| SSID or password mismatch | The SSID or password details may not match the selected network. | Check the network name and entered password. | Re-enter the connection details and continue the setup flow. |
| Weak signal | A weak signal or router distance may affect the connection attempt. | Check the router signal and distance between the router and smart plug. | Retry the reconnect step after confirming local signal conditions. |
| Router isolation or reconnect issue | Router isolation or other network conditions may limit device communication. | Check whether the router environment allows the smart plug connection path. | Review the setup conditions before making further changes. |
Energy readings not appearing after connection
Energy readings not appearing after connection can happen when a connected smart plug has joined the app but monitoring data is not yet visible. A connected smart plug does not always mean that energy monitoring activity is active, so connection status and monitoring activity should be checked separately.
Missing readings can depend on appliance power draw, app dashboard behavior, app refresh interval, firmware prompts, and model support. Low-power standby devices may show limited or delayed usage data because the available load conditions can affect metric visibility.
Energy readings not appearing after connection can be checked with this checklist to verify whether monitoring data is active or delayed:
- Live wattage: Check whether live wattage or real-time power is visible in the app dashboard. Available values can depend on the connected load and model support.
- kWh history: Check whether kWh history or usage readings are available after connection. Energy data visibility can vary by app and device configuration.
- App refresh interval: Review whether the app dashboard needs time to refresh updated readings. Refresh behavior can vary by app version and model support.
- Appliance power draw: Check whether the connected appliance is using measurable power. Low-power standby conditions may result in limited or delayed usage data.
- Firmware prompts: Check for firmware prompts or app requests that may affect available monitoring features.
- Model support: Confirm that the connected smart plug supports the expected energy metrics. Different models may provide different metric visibility.
When connection is confirmed but energy data remains unavailable after these setup checks, energy monitoring smart plugs context can help separate setup conditions from broader monitoring questions.